Libris

We craft the book, You create the story...

10 Journal Prompts to Keep Your mind & Pen Flowing

As a writer, finding inspiration for your journal entries can sometimes be a challenge. Whether you're feeling stuck in a creative rut or simply looking to explore new avenues of self-reflection, journal prompts can be a valuable tool to keep your pen flowing and your mind engaged.

We've compiled a diverse list of the top 10 journal prompts to ignite your imagination, spark introspection, and enhance your writing practice. These prompts are designed to encourage free-flowing thoughts, self-discovery, and personal growth, offering a range of topics to inspire and invigorate your journaling journey. Grab your favorite journal, a cup of tea, and get ready to embark on a transformative writing adventure.

Prompt 1:
Reflect on a time when you faced a major obstacle or setback. What did you learn from the experience, and how did it shape your perspective on resilience and perseverance?
Prompt 2:
Describe a person who has significantly impacted your life, either positively or negatively. How has this individual influenced your values, beliefs, or aspirations?
Prompt 3:
Consider a moment when you felt completely out of your comfort zone. What did you learn about yourself during this experience, and how did it contribute to your personal growth?
Prompt 4:
Imagine your ideal version of a "perfect day." What activities would you engage in, and what factors would contribute to your sense of fulfillment and contentment?
Prompt 5:
Explore a goal or dream that you've been hesitant to pursue. What fears or doubts have held you back, and how might you overcome these barriers to unlock your full potential?
Prompt 6:
Contemplate a time when you witnessed an act of kindness or compassion. How did this instance impact you, and in what ways do you strive to embody similar virtues in your own life?
Prompt 7:
Consider the concept of forgiveness. Is there someone you need to forgive, either externally or internally? What steps can you take to release any lingering resentment and embrace a sense of emotional liberation?
Prompt 8:
Think about a book, movie, or work of art that deeply resonated with you. What themes or messages from this creation continue to influence your perspective on life and humanity?
Prompt 9:
Explore a belief or assumption that you once held but have since reconsidered or evolved from. What prompted this shift in perspective, and how has it broadened your understanding of the world?
Prompt 10:
Imagine yourself 10 years from now. What do you hope to have accomplished, and what steps can you take today to set yourself on the path toward these aspirations?

We have created a downloadable PDF version of these prompts to keep on hand with your personal journal. To grab the download, just click here or on the link the below.

If you’re looking for a new journal you might want to check out our range. Choose from our individually handcrafted designs straight from the bindery bench or select something from popular brands such Traveler’s Co, Paperblanks and Karst.

From Fabric to Tome: A Step-by-Step Guide to Making Your Own Book Cloth

With the recent launch of our online course, The Beginner’s Bookbinding Blueprint we have been talking a lot about bookbinding materials. In our beginner’s course (both online and in person) we create a half bound cloth binding. This style of binding has a hardcover, with a cloth spine and decorative papers on the sides of the cover. The spine material used in this binding is ‘bookcloth’ or can be ‘buckram’. To the beginner, this may be an unfamiliar material and can be something perceived to be really hard to find.

So what is book cloth?

Buckram, muslin, canvas and linen are all used for various purposes in bookbinding. Book cloth is a specially designed fabric used in bookbinding to cover and protect the exterior of a book. It’s usually made from cotton, linen, or a blend of both, and is often starched and coated with an acrylic or vinyl material to provide durability and resistance to wear and tear. A good book cloth should not stretch easily, should be reasonably resistant to water, and have a fairly tight weave to prevent adhesives from seeping through. Obviously if you just do a Google search for ‘book cloth’ or ‘buckram’ you will find there is a vast array of options for purchasing ‘ready-made’ book cloth, but if you are interested in really unleashing your creativity, you’ll be pleased to know that it is possible with a little trial and error, to make your own!

DIY bookcloth

There are actually several ways to make your own book cloth. Which one you choose will ultimately depend on how you want to use your book and the result you would like to achieve. Read on below for a few options, with the pros and cons of each method.

IRON - ON BOOKCLOTH

We’re starting with the easiest one! You only require a few basic items to complete this.

WHAT YOU WILL NEED:

  • Fabric (a cotton or linen fabric works best)

  • Iron-on adhesive (like Heat n’ Bond Ultrahold)

  • Tissue paper or Japanese rice paper

  • Baking paper

  • Iron.

STEP 1:

Place your fabric, face down, on your cutting mat and cover with a matching amount of iron-on adhesive (eg. Heat n’ Bond Ultrahold - available from Spotlight or similar stores) and cut the amount required.

STEP 2:

Use an iron to adhere the iron- on adhesive to the back side of your fabric (follow the instructions on your chosen product for this step).

STEP 3:

Allow your fabric and adhesive to cool and remove the protective backing from the adhesive. Place your tissue paper over the adhesive and usse your baking paper to protect the tissue from direct contact with the iron. Iron the tissue onto the adhesive. The heat from the iron will activate the adhesive, while the baking paper will stop the tissue from burning.

Finally, complete your bookcloth by trimming the edges to ensure that both the fabric and tissue lining are fused together.

PROS: Mess free, only a few steps, quick to do

CONS: Fabric won’t be water resistant, Fabric can mark, easily - (ie. not ideal for recipe books!), fabric can not be hot foiled or embossed.

PASTED BOOKCLOTH

This is almost identical to the previous method with the main difference being using a paste to adhere the fabric to the backing tissue.

WHAT YOU WILL NEED:

STEP 1:

Cut your fabric and tissue paper to the required size.

STEP 2:

Place your fabric face down on a hard surface such as your bench or a piece of stone if you have one. Next you are going to paste one side of the tissue.

STEP 3:

Apply a thin layer of paste to one side of your tissue. Gently lift the paper (it will want to curl so lift both edges at the same time) and place the pasted side of the tissue onto the back of your fabric.

STEP 4:

Use your hand or a rolling pin to smooth down the paper on the fabric. You need to press or roll out any air bubbles but you should try to avoid pressing the paste through the fibres of the fabric.

STEP 5:

Leave your book cloth to dry overnight. Trim the edges. It is now ready to use.

PROS: Very inexpensive, Easy to make, Not time consuming (excluding drying time)

CONS: Can be messy, Fabric won’t be water resistant, Fabric can mark, easily - (ie. not ideal for recipe books!), fabric can not be hot foiled or embossed.

COATED BOOKCLOTH

The final method we’ll explore in this post is for a ‘coated’ or ’filled’ book cloth. Again there are several methods to do this using slightly different ingredients. This is the most complex of the three but the result is the most like the book cloth that we would use in the bindery on a regular basis.

WHAT YOU WILL NEED:

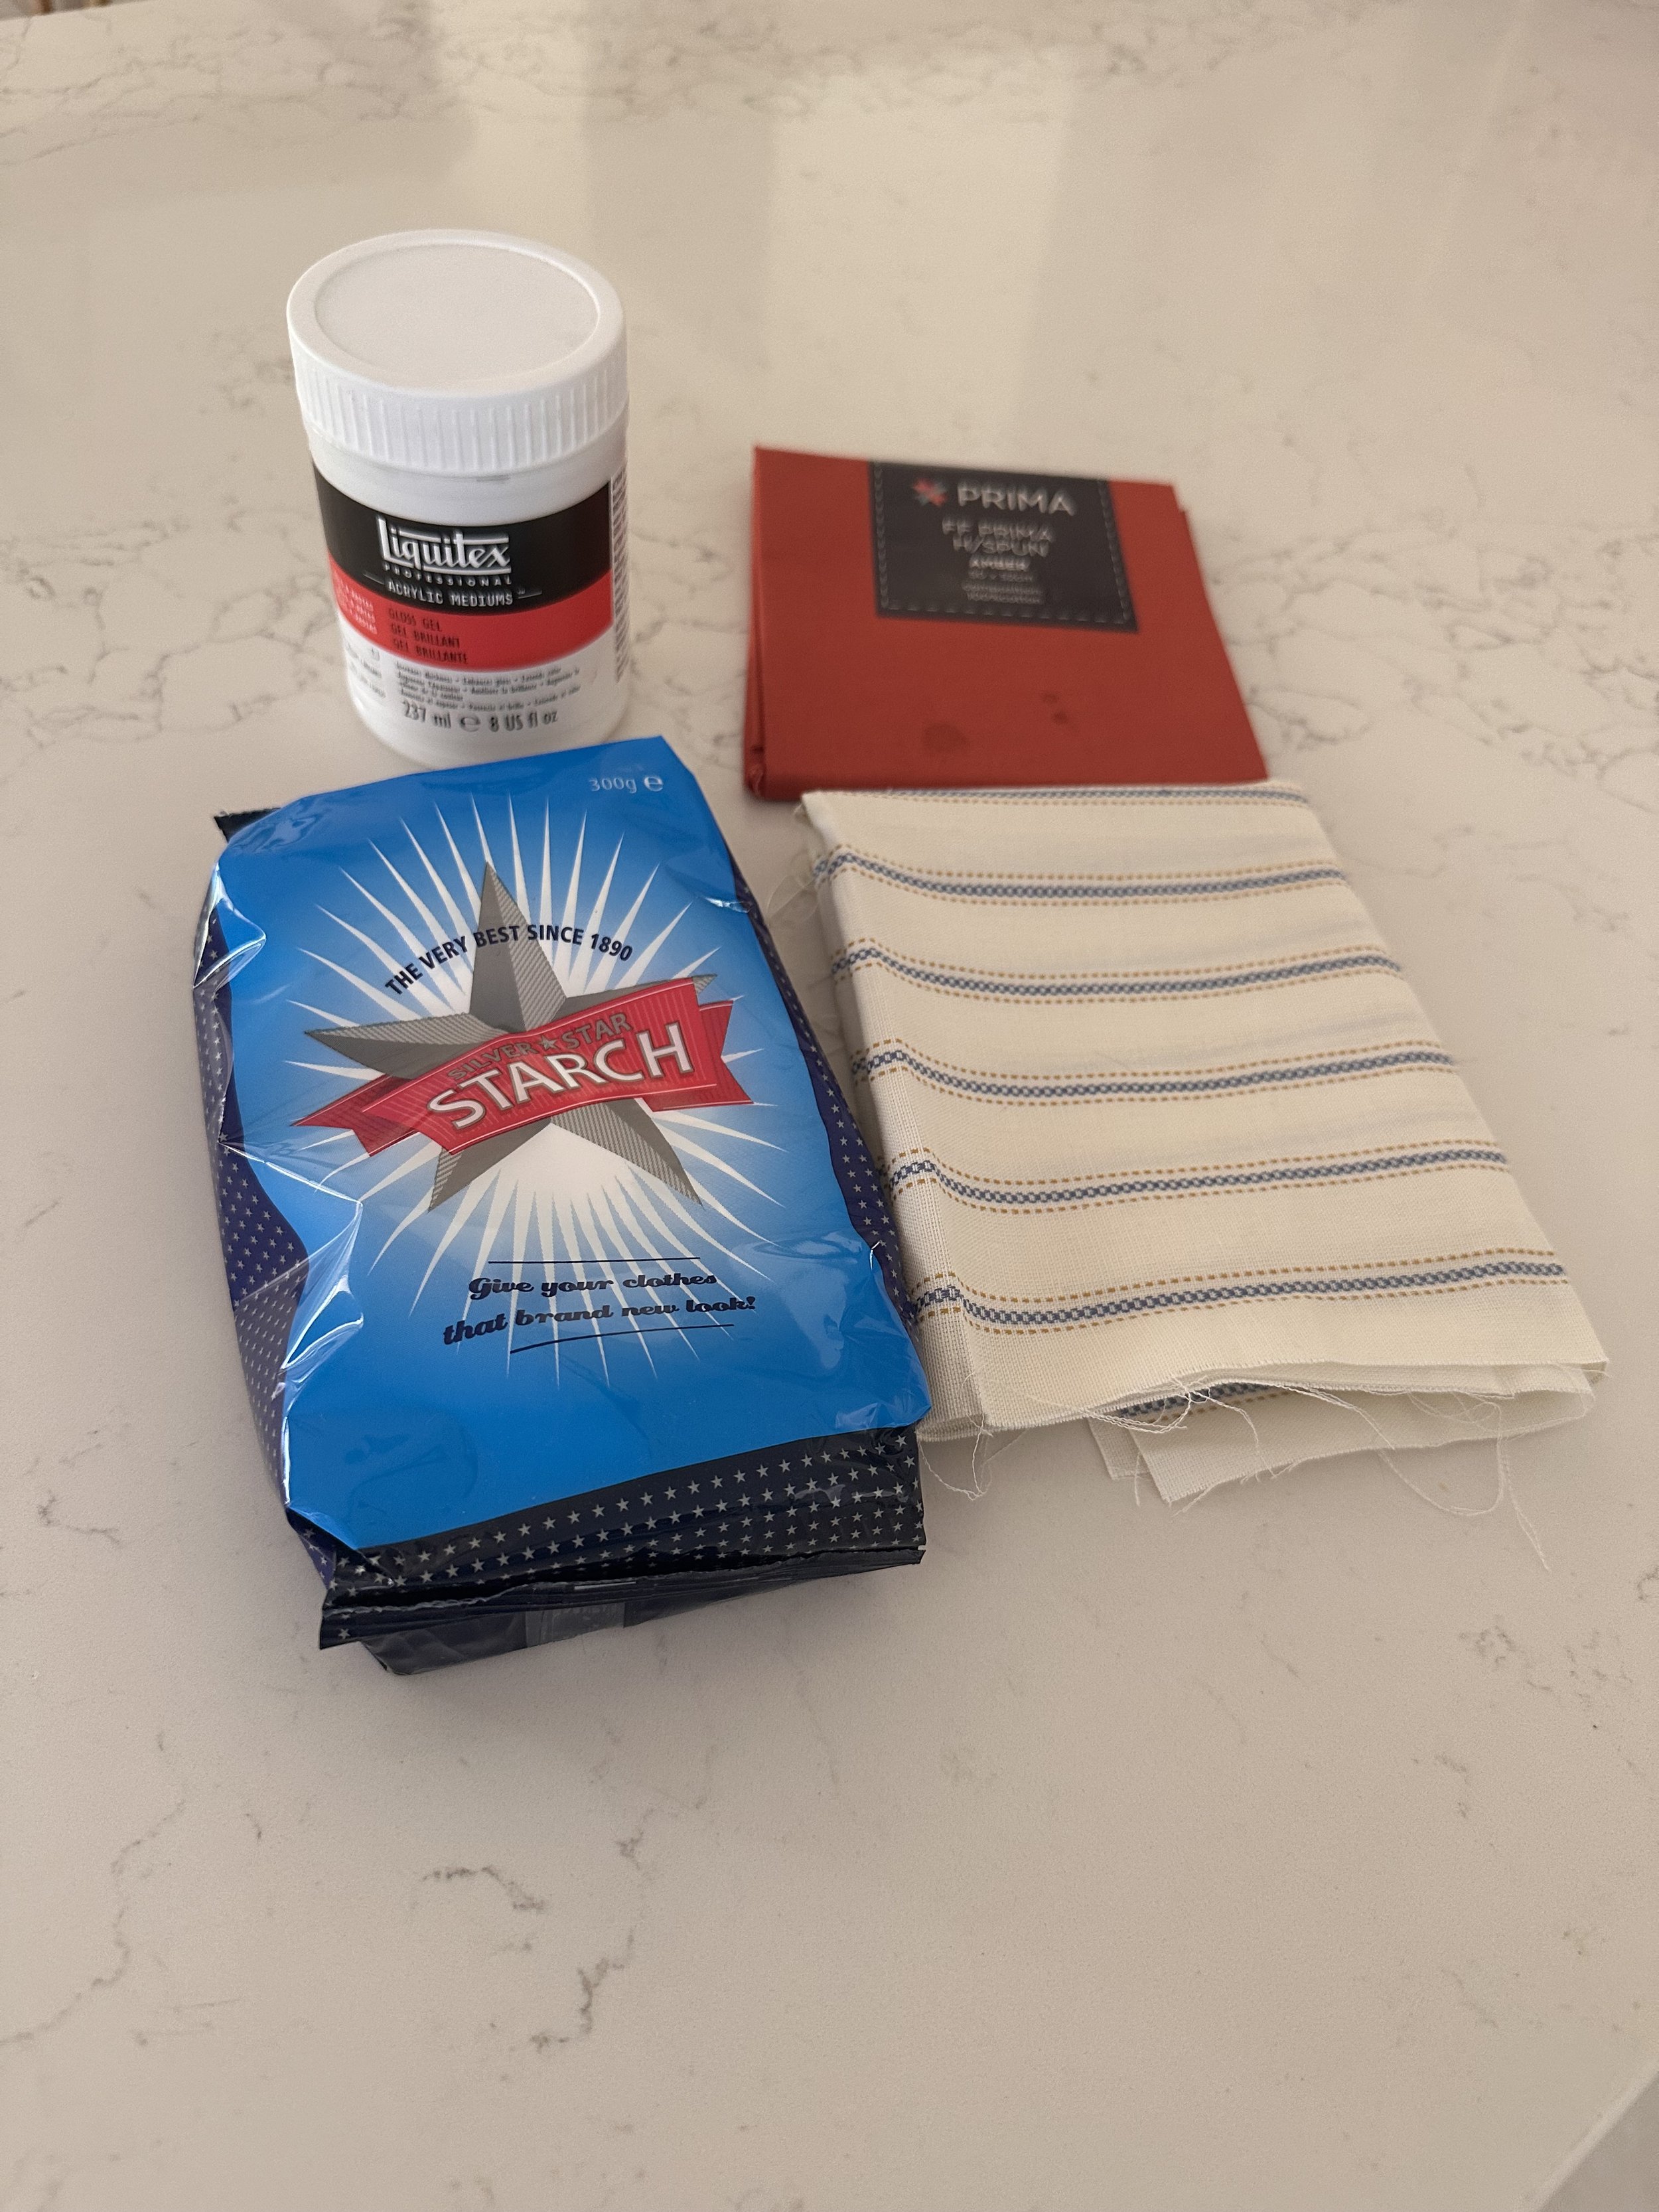
  • Fabric (this method requires a tightly woven cotton or linen)

  • Acrylic medium (available in art supplies shops like Zart Art)

  • Starch Paste (The bindery one is from the UK - but I used this Silver Star one that is easy to find)

  • A piece of stone, glass or heavy plastic

  • Paste Brush or Mini Paint Roller

Acrylic medium, Cotton Fabric, Silver Star Starch

STEP 1:

Cut your fabric so that you have enough for your book cover - make sure you allow extra for turning the fabric over the cover boards, plus about an extra 2cm on one short edge.

STEP 2:

Make some starch paste by mixing a tablespoon of starch powder with about 4 - 5 tablespoons of water & microwave for 20 seconds. Whisk while warm to get rid of lumps.

STEP 3:

In a small dish or bowl, mix the starch paste with the acrylic medium in a ratio of 1:1. How much you mix will depend on how much fabric you want to coat/fill. For one small book approximately 50ml of each (100ml) adhesive in total is more than enough.

STEP 4:

Lay your fabric on the stone/glass/plastic. Coat the entire side (excluding the extra 2cm on the top edge- I taped my edge) with a thin but even layer of the adhesive mixture. Use brush strokes from the top to bottom, slightly overlapping each stroke to ensure no gaps.

STEP 4:

Turn the fabric over and repeat step 3 on the other side,(again excluding the top 2cm on the same top edge) ensuring no gaps.

STEP 5:

Depending on the temperature/humidity and if you are using air conditioning, the book cloth will completely dry overnight. My preferred method for drying is to leave it on the piece of stone until just tacky but not completely dry, then peel off the stone and peg the top edge that you didn’t apply glue to on a drying rack (or clothes line) so that both ‘filled’ sides are not touching anything. To finish trim off the ‘peg edge’ as this hasn’t been treated and you’re ready to use your book cloth.

The end result was a stiffened fabric with a slight but not too obvious coating. The fabric was slightly darker than the original uncoated fabric, but was definitely more resistant to marks. In addition, a huge bonus was that the fabric was able to be embossed with names or decorative elements.

PROS: Protects the fabric with a coating, somewhat water resisant, wipeable, most fabrics treated this way will tolerate hot foiling/ embossing, Gives you huge variety of colour/pattern options

CONS: More expensive than other methods mentioned, Takes a bit or trial and error, Messier than the other methods, Slightly more time consuming

Adventure Awaits - Building Your Traveler's Company Notebook

There's a unique allure to the act of travelling that captures the essence of discovery, uncertainty, and boundless potential. The mere thought of embarking on a journey to uncharted territories, immersing oneself in unfamiliar cultures, and witnessing breathtaking landscapes ignites a sense of excitement that lingers in the heart. The world is a tapestry of wonders waiting to be unraveled, and the prospect of charting new horizons fills the soul with an insatiable thirst for adventure. Indeed, travel embodies the epitome of exhilaration, curiosity, and awe, making it a pursuit cherished by many. As we anticipate the next expedition into the unknown, the fervor to capture every fleeting moment intensifies, and the traveler's notebook emerges as a cherished companion in weaving the narrative of our wanderlust.

Traveler's Company is a Japanese brand that has captured the hearts of stationery enthusiasts and travellers around the world with its line of well-crafted and thoughtfully designed products . Renowned for their signature leather travel notebooks, the brand has become synonymous with a sense of adventure, wanderlust, and a deep appreciation for the art of journaling. In addition to their iconic notebooks, Traveler's Company offers a range of high-quality accessories such as brass pens, brass index clips, and adhesive pockets, all exuding a beautiful simplicity and practicality that resonates with those who appreciate both functionality and aesthetics in their everyday carry items. With a dedication to preserving the spirit of travel and storytelling, Traveler's Company continues to inspire a global community of creatives, writers, and explorers to document their journeys and embrace the beauty of simplicity in their daily lives.

Discover the Endless Possibilities of Personalisation
Experience the unparalleled allure of our boutique stationery store with the captivating range of Traveler’s Notebooks. Elevating the enchantment of these items is the boundless potential to tailor them to your unique preferences and flair. Immerse yourself in a world of creativity as you seamlessly incorporate diverse inserts for daily journaling, scrapbook-style memento collection, artistic sketching, or simply for all your miscellaneous treasures. Embrace the exquisite leather cover that not only exudes timeless elegance but also promises to safeguard all your cherished contents, ensuring they remain impeccable whether you're navigating the globe or embarking on your everyday escapades. Unveil the art of customization and let your creativity flourish with every adventure.